Fork me on GitHub
13 Aug 2015
分享到:
Comments

使用springdata JPA实现分页

1.创建dao,继承JpaSpecificationExecutor和PagingAndSortingRepository。如下:


    public interface CodeEntryDao  extends JpaSpecificationExecutor,PagingAndSortingRepository<CodeEntry,Long> 
</pre>

2.提供findAll接口,传入Specification 和Pageable 两个参数。如下:


public Page findAll( Specification spec,Pageable pageRequest);
</pre>

3.在service中调用findAll时创建Specification和Pageable,Specification是查询条件,Pageable包含pageNumber,pageSize,sort等参数。创建过程如下。

    
        /**
         * 创建分页请求.
         */
        private PageRequest buildPageRequest(int pageNumber, int pagzSize, String sortType) {
            Sort sort = null;
            if ("auto".equals(sortType)) {
                sort = new Sort(Sort.Direction.DESC, "id");
            } else if ("id".equals(sortType)) {
                sort = new Sort(Sort.Direction.ASC, "entryId");
            }
    
            return new PageRequest(pageNumber - 1, pagzSize, sort);
        }
    
    
        /**
         * 创建动态查询条件组合.
         */
        private Specification buildSpecification(Map<String, Object> searchParams) {
            List< SearchFilter> filters = (List) SearchFilter.parse(searchParams);
            Specification spec = DynamicSpecifications.bySearchFilter(filters, CodeEntry.class);
            return spec;
        }
</pre>

创建Specification时需要要有searchFilterDynamicSpecifications]类支持,点击去github克隆源码

16 Jul 2015
分享到:
Comments

在Spring中获取ServletContext方法

注意:下面代码是在web环境中才能获取到WebApplicationContext,ContextLoader为spring中创建applicaitonContext上下文的类,而applicationContext是spring的核心

WebApplicationContext webApplicationContext = ContextLoader.getCurrentWebApplicationContext(); ServletContext servletContext = webApplicationContext.getServletContext();

11 Apr 2015
分享到:
Comments

使用ssh密匙连接github

git使用https协议,每次pull, push都要输入密码,相当的烦。 使用git协议,然后使用ssh密钥。这样可以省去每次都输密码。

大概需要三个步骤: 一、本地生成密钥对; 二、设置github上的公钥; 三、修改git的remote url为git协议。

一、生成密钥对。 ============= 大多数 Git 服务器都会选择使用 SSH 公钥来进行授权。系统中的每个用户都必须提供一个公钥用于授权,没有的话就要生成一个。生成公钥的过程在所有操作系统上都差不多。首先先确认一下是否已经有一个公钥了。SSH 公钥默认储存在账户的主目录下的 ~/.ssh 目录。进去看看:

$ cd ~/.ssh $ ls authorized_keys2 id_dsa known_hosts config id_dsa.pub

关键是看有没有用 something 和 something.pub 来命名的一对文件,这个 something 通常就是 id_dsa 或 id_rsa。有 .pub后缀的文件就是公钥,另一个文件则是密钥。假如没有这些文件,或者干脆连 .ssh 目录都没有,可以用 ssh-keygen 来创建。该程序在 Linux/Mac 系统上由 SSH 包提供,而在 Windows 上则包含在 MSysGit 包里:

$ ssh-keygen -t rsa -C "your_email@youremail.com" # Creates a new ssh key using the provided email # Generating public/private rsa key pair. # Enter file in which to save the key (/home/you/.ssh/id_rsa):

完了之后,大概是这样。

Your identification has been saved in /home/you/.ssh/id_rsa. # Your public key has been saved in /home/you/.ssh/id_rsa.pub. # The key fingerprint is: # 01:0f:f4:3b:ca:85:d6:17:a1:7d:f0:68:9d:f0:a2:db your_email@youremail.com

这样。你本地生成密钥对的工作就做好了。

二、添加公钥到你的github帐户

======================== 1、查看你生成的公钥:大概如下:

$ cat ~/.ssh/id_rsa.pub
ssh-rsa AAAAB3NzaC1yc2EAAAABIwAAAQEAklOUpkDHrfHY17SbrmTIpNLTGK9Tjom/BWDSU GPl+nafzlHDTYW7hdI4yZ5ew18JH4JW9jbhUFrviQzM7xlE LEVf4h9lFX5QVkbPppSwg0cda3 Pbv7kOdJ/MTyBlWXFCR+HAo3FXRitBqxiX1nKhXpHAZsMciLq8V6RjsNAQwdsdMFvSlVK/7XA t3FaoJoAsncM1Q9x5+3V 0Ww68/eIFmb1zuUFljQJKprrX88XypNDvjYNby6vw/Pb0rwert/En mZ+AW4OZPnTPI89ZPmVMLuayrD2cE86Z/il8b+gw3r3+1nKatmIkjn2so1d01QraTlMqVSsbx NrRFi9wrf+M7Q== schacon@agadorlaptop.local

2、登陆你的github帐户。然后 Account Settings -> 左栏点击 SSH Keys -> 点击 Add SSH key 3、然后你复制上面的公钥内容,粘贴进“Key”文本域内。 title域,你随便填一个都行。 4、完了,点击 Add key。

这样,就OK了。然后,验证下这个key是不是正常工作。 $ ssh -T git@github.com # Attempts to ssh to github

如果,看到: Hi username! You've successfully authenticated, but GitHub does not # provide shell access. 就表示你的设置已经成功了。

三、修改你本地的ssh remote url. 不用https协议,改用git 协议 ================================================ 可以用git remote -v 查看你当前的remote url $ git remote -v origin https://github.com/someaccount/someproject.git (fetch) origin https://github.com/someaccount/someproject.git (push)

可以看到是使用https协议进行访问的。

你可以使用浏览器登陆你的github,在上面可以看到你的ssh协议相应的url。类似如下: git@github.com:someaccount/someproject.git

这时,你可以使用 git remote set-url 来调整你的url。 git remote set-url origin git@github.com:someaccount/someproject.git

完了之后,你便可以再用 git remote -v 查看一下。

OK。

至此,OK。

你可以用git fetch, git pull , git push, 现在进行远程操作,应该就不需要输入密码那么烦了。

17 Mar 2015
分享到:
Comments

使用nexus配置maven代理服务器学习笔记

要用nexus配置maven私服,首先需要在服务器中安装nexus。nexus下载地址:http://www.sonatype.org/nexus/

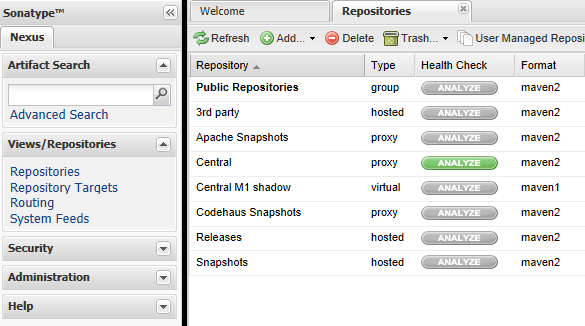
下载之后解压到随意目录,在安装目录下D:\nexus\nexus-2.11.2-04\bin\jsw\找到对应系统目录, 点击console-nexus.bat启动nexus服务器。在浏览器中输入http://localhost:8081/nexus进入nexus,用admin/admin123登陆 。可以看到:

nexus-01

点击respositories在右边窗口中看到所有仓库。仓库类型分为:group、hosted、proxy,group是仓库组,可以包括多个hosted,proxy仓库,hosted是本地仓库使用mvn depoy上传的仓库,proxy是官方代理仓库。

在maven项目中的parent pom.xml中配置

nexus nexus respo http://localhost:8081/nexus/content/groups/public/ true true

指定nexus私服,项目在添加新的依赖后会在配置的私服中下载新的jar包,如果没有私服会自动去中央仓库中下载

在项目中,会因为模块比较多原因,这样就要在每个模块中添加上面的配置,一般这种情况都把配置写在maven的/conf/settings.xml中

在settings.xml中添加profile标签

nexusprofile nexus nexus respo http://localhost:8081/nexus/content/groups/public/ true true

配置了profile以后还需要把这个profile打开,才会使用到

使用 centralprofile 将上面得profile打开

这种配置当项目添加依赖后,在私服中不到,就会去中央仓库中下载,如果不需要去中央仓库中下载,需要配置镜像。

nexusMirror * Human Readable Name for this Mirror. http://localhost:8081/nexus/content/groups/public/

这个配置的意思是如果项目中添加新的依赖,maven所有的仓库都会先在私服中下载,如果没有,不会再去中央仓库中下载

更多博客

什么是工作流,学习之后的理解 02 Nov 2014 Comments
在本地安装jekyll测试环境 03 Aug 2014 Comments
firstblog 22 Jul 2014 Comments